|
This article will lead you how to install MPPS Chiptuning Flasher cable and software on your Windows computer. This needs to be done FIRST, before you can connect MPPS to your car.
This guide applies to MPPS version 12+.
|
NOTICE: MPPS only works on Windows XP, Vista, 7. It does NOT work on Win 8, 10+, or MacOS. However there IS a solution offered here.
|
Step 1: Download MPPS Driver Files for Windows
Download drivers here.
Unextract file anywhere on your computer.
Step 2: Connect MPPS USB Cable to Computer
In most cases, when you connect MPPS to your computer, automatic driver installation will fail. Here's what it may show in Windows...

If driver installation was not successful (as shown above), please go to Step 3 below.
If driver installation was successful, skip to Step 5.
Step 3: Access Device Manager
Windows Vista/7/8/10: Control Panel » System » Device Manager
Windows XP: Control Panel » System » "Hardware" tab » Device Manager
Step 4: Install Driver Files
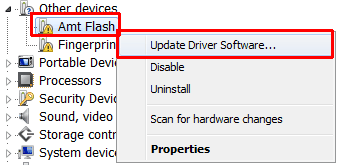
Under "Other devices", right-click on "Amt Flash" and click on "Update Driver Software". Example...
Then Browse to the folder where you unextracted downloaded file in Step 1.
Drivers will now be successfully installed.
Now let's install the software...
Step 5: Install MPPS Software
Download MPPS software here (ver 12). Unextract and install.
Hook other end of cable to car. Turn on car ignition.
Launch MPPS software. And play around.
Otherwise, click here to read MPPS usage guide.
|