
Knowledgebase
|
How to Install ELM327 WIFI OBD Scanner on Windows
Posted by Alex E. on 02 October 2014 06:27 PM
|
||||

This guide explains how to connect ELM327 WIFI scanner to Windows. (For Android/iOS, click here.)
Windows Vista, 7, 8, 10+:
| ||||
| Password to connect to WIFI: 12345678 |
Windows XP:
- Plug ELM327 WIFI Scanner into vehicle's OBD2 port. (Port is usually found on the driver side dashboard under the steering wheel.)
- Turn ON ignition. (This is one step before engine is powered.)
- Inside Windows WIFI manager — connect to Wi-Fi signal with name similar to these examples: WIFI ELM327, WiFiOBD, OBDDevice, V-Link.
NOTE: It can take up to 30 seconds to WIFI signal to show.
Password to connect to WIFI: 12345678
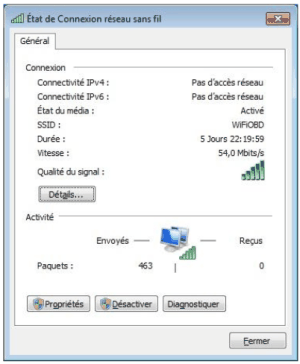
- Once you've connected, right-click on the WIFI signal and click "Status". The following window will appear:
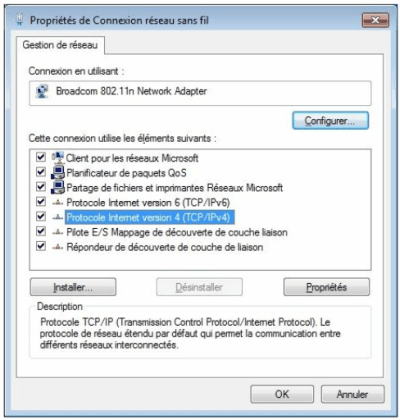
Click on "Properties".
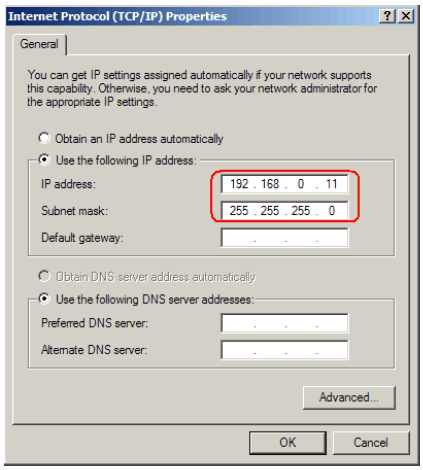
Change the connection's TCP/IP setting by entering a static IP address.
Set the IP as:
192.168.0.11And the subnet mask as:
255.255.255.0
The new settings are complete. Close all windows and go to next step below...- Launch your OBD Software. (We recommend TOAD software which is 100% compatible with WIFI.)
- Go to software Settings and configure it to look for WIFI. (It's usually set to USB or Bluetooth).
- Configure WIFI IP Address to 192.168.0.11 (or 192.168.0.10) and Port to 35000. (Or number that sellers/manufacturers page has stated. Check their website where you bought your WIFI ELM327.)
- Software should now successfully connect to your vehicle.
| Resources: |
- ELM327 AT Commands: List of commands you can manually type into OBD software terminal.


