

In-tank fuel filters are part of everyday service life with modern cars.
Here are some tips to help get the job done efficiently, and some traps to avoid particularly on Japanese cars, mostly Toyotas.
Before replacing an in-tank fuel filter be sure you have allowed enough in your price estimate to do the job because sometimes the parts can be quite expensive and the job may take you longer than you think.
To prevent future problems, it is essential to use a good brand of filter.
It also pays to check if a complete fuel pump and filter assembly is available at a reasonable price. Sometimes it can cost only a little more to buy a brand new complete assembly.
I have found that approaching the job with the correct attitude helps get the job done.
It’s no use complaining , ‘Who in their right mind designed this?’. The simple fact is it’s a fuel filter, it has to be replaced at certain intervals, so just do it.
Don’t expect to do your first one in world record time. Like most jobs tackled for the first time, it takes time to work out the best process.
Most of the Asian cars Iservice require in-tank fuel filters to be replaced at 60,000 or 80,000 kilometre intervals.
Sometimes special tools may be required to remove the top nut on the fueltank,together with the fuel lines.
The first challenge is to work out how to access that in-tank fuel filter. In most Asian and Japanese cars the in-tank fuel filter can be accessed under the back seat. The back seat is tilted or removed and the carpet pulled back to expose an inspection cover.
When the cover is removed, clean around the wiring harness, the fuel line fittings and the fuel tank top lid.
A quick word on safety is appropriate here. Make sure this task is done in a well ventilated area and that the workshop light or lead light is not faulty. Be careful if using a cordless drill – in fact, better if you don’t.
Mark the orientation of the top nut, filter module assembly and any wires or hoses with a white marker or texta to avoid confusion later.
Taking a photo or two can also be a great idea before pulling it apart.
After all parts have been thoroughly cleaned, disconnect the wiring harness and disconnect the fuel line hose adapters.
Sometimes , special tools maybe required to disconnect the hose fittings.

The tank top lid retainer nut can then be unscrewed. It can be very tight, so special tools may be needed.
Next remove the in-tank fuel filter module assembly from the fuel tank, which can be a little tricky.
It’s vital that the top nut is screwed back on the top of the fuel tank. It is common for the fuel tank to swell which can make refitting the top nut impossible.
Remove the top 0-ring or seal and put it somewhere safe to dry.
Put the module assembly on a clean bench, paying attention to where everything is positioned. Again, a photo will be handy for future reference.
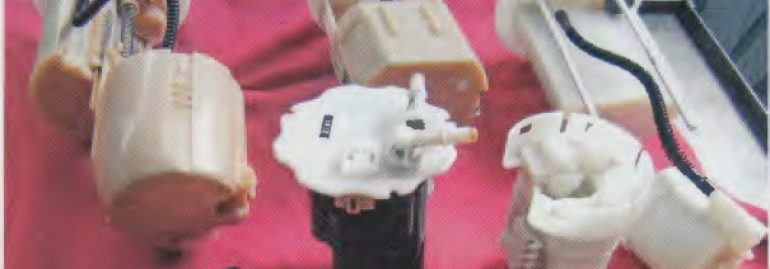
The next job is to strip the running gear from the module assembly.
One by one, remove all wiring, the fuel gauge arm and resistor and the high pressure pump, taking care to not lose the fuel pump 0-ring or the fuelpressure regulator.
Now refit all the parts, including the new fuel filter, in the reverse order, paying particular attention to the fitting of the fuel pump 0-ring and any other 0-rings.
A squirt of throttle body cleaner can help to lubricate 0-rings.
However, in some cases, like late model Toyota Yaris and Corolla,the module assembly includes the fuel filter.This is called a plate assembly,so it’s just a case of swapping the items over to
the new plate assembly, including the fuel gauge sender, pump assembly and pressure regulator.
When fitting the fuel pump to the new fuel filter be sure to fit the 0-ring or seal correctly on the top.
When fitting a new plate assembly type filter sometimes there is a non-return valve at the bottom of the swirl pot,so be sure to swap this over.
Fit the new fuel filter and module assembly back into the fuel tank and correctly tighten the top nut. Connect up all hoses and wiring assembly.
Start the car and check for any leaks before reinstalling the top cover. If all is OK refit the top cover, followed by the carpet and the back seat.

